How to Learn to Play the Guitar as a Beginner in 7 Steps [Step by Step Guide]
From a total beginner to a novice-level guitarist, this step-by-step guide is perfect for inspiring guitarists!
![How to Learn to Play the Guitar as a Beginner in 7 Steps [Step by Step Guide]](/content/images/size/w1200/2024/01/thumbnail-3.png)
What you need to start
What you need is a guitar, and preferably a capo as well.
Step 1: Familiarize yourself with the string order and string names of the Guitar
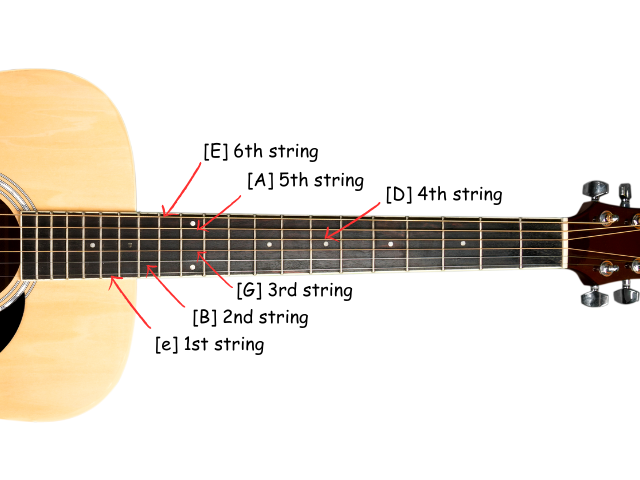
As you can see from the above picture, you must not only familiarize yourself with what sound each string makes, but also what number of each string is referring to.
Familiarizing yourself with this knowledge will make it easier for you to understand guitar tablature (guitar tabs for short).
How do we familiarize ourselves with the string order?
Play each string open (without holding down any frets), while stating the number of the string aloud.
To remember what sound each string make, simply remember this abbreviation: “Eddy Ate Dynamite Good Bye eddy” (EADGBe)
I don’t remember what YouTube video I got this abbreviation from so forgive me for not being able to provide credit 😔.
Step 2: Familiarize yourself with Fret Positions
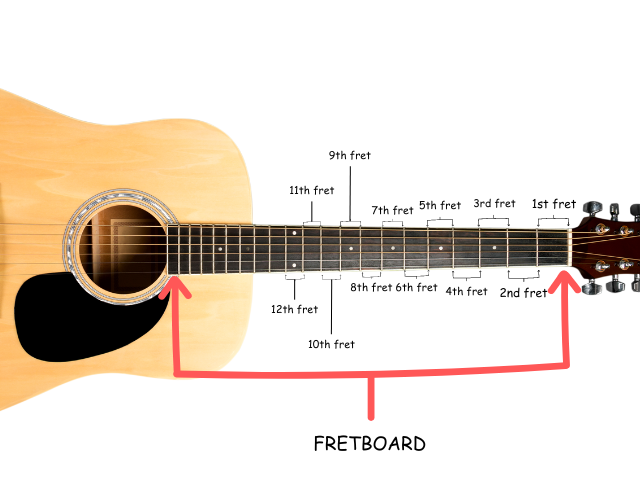
Technically a “fret” is what you call the long and thin metal bars that is located in the fretboard.
But when guitarist say things like 1st fret, 2nd fret, 3rd fret, etc., they usually are referring to the space immediately before the fret.
The 12th fret is where the musical pattern starts to repeat itself. The 12th fret produces the same pitch as an open string, but one octave higher.
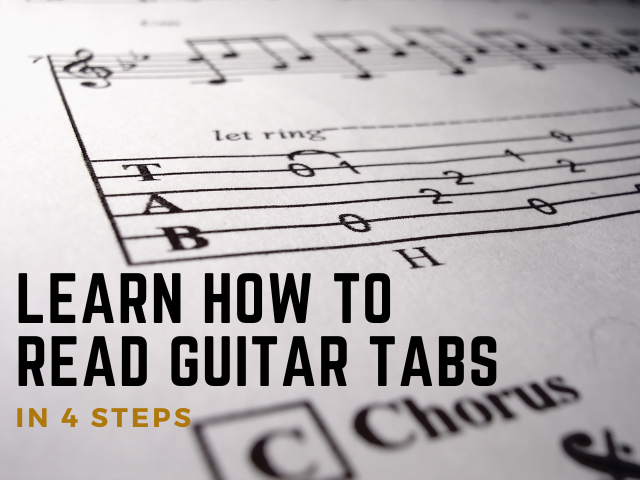
Step 3: Learn how to read Guitar Tabs
Start by reading the tabs from left to right.
The small “e” refers to the first string or the last and thinnest string when you are holding your guitar.
“B” is the second string, “G” 3rd string, “D” 4th string, “A” 5th string, "E" 6th string
The numbers are referring to what number of frets that the string has to be pressed down
Special symbols or notations may be used to indicate techniques like palm muting, bending, sliding, etc., but if you are an absolute beginner, then you do not have to go familiarizing these symbols just yet.
Sometimes, if your song has strumming and finger picking motions, an upward and downward arrow will be placed in the tablature as a way to convey that you need to strum instead of picking the strings.
For more information about learning how to read Guitar Tablature, click here.
TIME TO START PLAYING
Before playing, make sure your guitar is not out of tune.
If it is out of tune, either ask for help to a nearby guitarist to tune your guitar for you or download a guitar tuning app in Play Store or another equivalent of that app store.
Step 4: Master the 7 basic chords
You don’t have to fully complete this step; in fact I advice you simply skip this.
This is from personal experience, so my advice is not at all scientific.
When I was learning how to play the guitar, I found that I grasped the basics more when trying to perform songs with my guitar with the help of YouTube than with standalone guitar tutorials.
So my suggestion is that to simply go to YouTube and search for "Guitar tutorial [Insert Song Here]" and learn the chords from there.
With that being said, if you still wish to know what the 7 basic chord I was referring to, then here it is.
Major Chords:
- A Major (A): x-2-2-2-0-0
- B Major (B): 2-4-4-3-2-2
- C Major (C): x-3-2-0-1-0
- D Major (D): x-x-0-2-3-2
- E Major (E): 0-2-2-1-0-0
- F Major (F): 1-3-3-2-1-1 [Barre Chord]
- G Major (G): 3-2-0-0-3-3
Minor Chords:
- A Minor (Am): x-2-2-2-0-0
- B Minor (Bm): 2-4-4-3-2-2 [Barre Chord]
- C Minor (Cm): x-3-5-4-4-3
- D Minor (Dm): x-x-0-2-3-1
- E Minor (Em): 0-2-2-0-0-0
- F Minor (Fm): 1-3-3-2-1-1 [Barre Chord]
- G Minor (Gm): 3-6-6-3-3-3 [Barre Chord]
I will leave this here in case you need it


Full Guitar Chords Chart by Standard Guitar
Step 5: Search an Easy Guitar Song Tutorial
As mentioned before, I found most of my success in learning guitar skills through trying to learn songs.
Beginner Guitar Songs:
Wonderwall
Performed by GuitarZero2Hero
Let It Be
Performed by MusikMan
Step 5.5: Challenge yourself by doing Easy Fingerstyle Tutorials
After mastering 2 or 3 minor beginner songs that I didn’t truly care about (I forgot the names of the songs), I quickly transitioned my focus on learning fingerstyle, because there is a specific song that I really wanted to learn, and it sounds better in fingerstyle.
It is surprisingly simple and not that difficult, I promise.
Easy fingerstyle songs:
Can't help falling in love with you
Performed by LetsPlayGuitar
Say You Won't Let Go
Performed by LetsPlayGuitar
Novice-level fingerstyle songs:
Tears in Heaven
Performed by LetsPlayGuitar
You are the Reason
Performed by LetsPlayGuitar
Step 6: Familiarize yourself with the terminologies related to Guitar playing
You can certainly do this step earlier; in fact, it can even be step 1. I just decided to place it here because it felt more like an extra bonus tip than a real part of the step-by-step guide.
Familiarizing yourself with guitar terminology is incredibly important for further growth (in terms of your guitar skills).
This is because you are a bound to hear these terminologies be mentioned in Yotube Tutorials and or see them being mentioned in Guitar Tabs.
There is no escaping this step. If you ever plan on being competent in playing the guitar; this is an absolute must.
Examples of Guitar Terminology
- Fretboard: The flat, usually wooden surface on the front side of the guitar neck, where the player presses down on the strings to produce different notes.
- Fret: Metal strips along the fretboard that divide it into segments.
- Hammer-On: A technique where a note is played by tapping the finger onto the fretboard after striking the string.
- Pull-Off: A technique where a note is sounded by removing a finger from a fret, creating a second note without re-picking the string.
- Bend: A technique where the guitarist pushes or pulls a string across the fretboard to change the pitch of the note.
- Etc.
Step 7: Practice Advance Techniques for improvement
Congrats, if you’ve done Step 1 – 6, you are essentially a guitar novice.
All that’s left is to practice advance (for beginners and novices at least) guitar techniques to go to the next level.
Examples of advance guitar techniques:
- Palm muting
- Tapping
- Hammer-on
- Pull-off
- Sliding
- Strum Slap
- Etc.
THINGS TO KEEP IN MIND
Conditioning is harder than learning good technique
If you are a beginner, your fingers are going to burn like hell, especially if you practice excessively in the first week.
I suggest you limit yourself to 2 sessions a day (maximum of 30 mins per session) for a week or two. Give your fingers time to develop callouses.
The pain you feel in your fingertips is somewhat rewarding though, it proves that you are making effort. It makes you want to try even harder.
So yeah, if you don’t mind pain, then go ahead and play. But be warned, if you keep playing through that pain, it is a guarantee that you'll reach a point where the pain becomes almost unbearable, making it unpleasant and tough to play pain-free for days.
Copyright ©2024 by Marshall Vulta


Comments ()